I had planned at least four more Christmas craft posts in the run-up to Christmas, but I’ve had to lay those plans aside for a while as my little boy was laid low with a horrible eye infection and a virus. We’ve had a tough old time of it all and a scary trip to the hospital, but we are all going to be ok and can start looking forwards again to a bit of time enjoying being a family, but unfortunately I have fallen ill and I have run out of steam. Instead of the posts I was intending to write, here is a quick round up of the things that I have made to make Christmas at the Codds’ a little more handmade and personal this year.
Betty Baubles

There was a time, when Russell and I had first moved in together, that we had an absolutely coordinated tree that looked like it had been dressed for a shop window. All of the decorations were white, silver and turquoise. We’d just moved house together and had not a single decoration between us and so bought them all to match and work perfectly, including a special couple of decorations to mark our first Christmas together.

We have added special decorations every year since then, but though the first year or two we made an effort to ensure they all worked together, we soon found that special things don’t always coordinate. I have since decorated the tree with ideas from a whole flock of birds in memory of my grandfather, which sit alongside the felt crab decoration that I made to mark my little boy’s first Christmas, as it was his favourite toy. For the past year or two, though, his firm favourite has been Betty from Hey Duggee, so she is the bauble I made especially for my toddler this year. Made from papier-mache, painted, face applied with vinyl, glittered and sealed with acrylic sealant spray, she is the sparkly purple focus of our tree this year.
Jingle Bells Jumper

This Year marked Darwin’s first ever nursery performance, where he sang a duet of Jingle Bells with one of his friends, jingling all the way. Parents had been asked to send their children in costume, which the teacher expanded on in this case as ‘put some pictures of bells on a jumper’.
I had some gold vinyl already in my heat transfer material selection, but I decided it was missing something, and that was a lot of shiny sparkle.

I bought some smooth glittery vinyl to put on the £2 school sweatshirt that I bought from a supermarket and cut some simple jingle bell shapes, adding some text in a dark pink vinyl. The glittery vinyl came with no guidelines to pressing temperature or settings, and didn’t adhere as well at my usual settings, so I pressed it at a higher temperature and it warped slightly. Oh well, t’is a shame but still looked great. I don’t know how hard-wearing it will be and how it might wash, but he returned from his concert with it clean so he’s worn it again for a Christmas party and it is currently his favourite sweatshirt. If it survives the wash it will be worn throughout Christmas, I am sure, as it is currently his favourite jumper.
Manatee Baubles

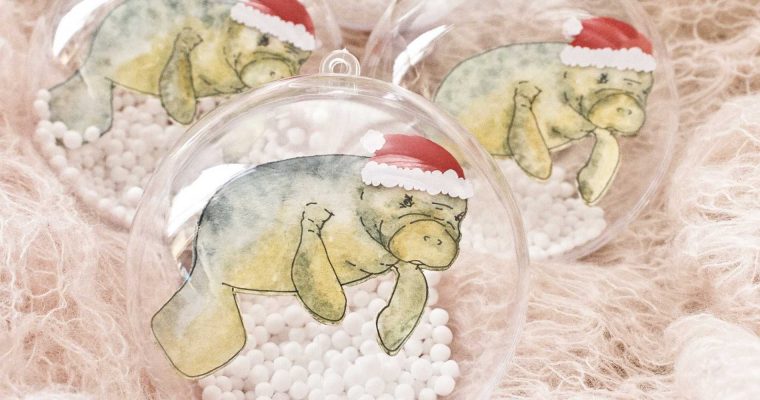
Whilst Darwin loves Betty and so I tend to make a lot of Betty/Hey Duggee themed fun things, I love manatees. Actually, a Christmas Manatee appears in Darwin’s other favourite show, Sarah & Duck, in the episode ‘Seacow Snow Trail’, so this next Christmas project was for all of us.
After painting an original large version of the Christmas Manatee to hang on our wall over Christmas I decided that I wanted to make a version to turn into Christmas cards. I don’t actually own a printer, so I re-drew the manatee in Illustrator and converted it to an SVG file to use with my Cricut machine. I think it’s an extremely cool process, so I’ve uploaded a little video of the Cricut machine drawing. Using a unipin fineliner for its waterproof ink, I was able to draw a large number of manatees ready for hand painting with watercolours.


To make the manatee baubles, I used the same technique I had used for the Roundy Baubs a couple of weeks previous. I had intended to write and photograph an entire tutorial on this, but prolonged health problems for me, and then a health scare and recent doctors/hospital visits for my little boy have meant that I just haven’t been able. Hopefully I will have a chance to make a few new ones in the New Year so that I can photograph the process, but as succinct a manner as possible:
- Cut two copies of your card shape (the shape should either be symmetrical, or one copy should be a mirror image of the other).
- Place one card shape face-down on a flat surface. Using washi/masking tape onto the flat surface, secure the ends of a 25cm length of invisible thread, running vertically down the front of the shape.
- Put a piece of double-sided sticky tape over the thread, securing it to the card. Remove the peel-off top layer of the tape.
- Repeat with another piece of invisible thread, this time running horizontally.
- Place your second card shape face up on top, lining them up and sandwiching the thread and double-sided tape.
- Remove the securing washi tape, and set the pieces aside.
- Take the topmost end of thread, and thread it through the hole on the ‘male’ half of the bauble, securing it to the bauble once more with the washi tape. Secure the other three thread ends to the sides of the bauble, keeping the thread taut and ensuring your card shape is central.
- Add some polystyrene balls, glitter, iridescent snow, jewels, sequins or anything else that takes your fancy to the inside of the bauble.
- Apply a minute amount of superglue to each of the ends of the thread at the point where the thread meets the edge of the bauble that will fit inside the female half of the bauble (where the thread will be trapped between the two bauble halves).
- lining up the two bauble halves with the holes for the ‘hooks’ at the top, fit the two halves together, trapping the tiny amounts of glue and invisible thread in between the two halves of the shell, and leave to dry.
- Add a ribbon, string or hanging hook as desired.

The manatee appears to ‘float’ inside the clear bauble, due to the invisible thread. They are quite a nice bauble for children to explore as they are relatively safe, unlike glass alternatives, and if using polystyrene balls as ‘snow’, rubbing the bauble on a soft cloth allows static to build up and the snow can ‘cling’ to the bauble front, so it looks as if the snow is drifting down.
Toddler Christmas Tree Baubles

The Christmas tree baubles that we made for Darwin’s grandparents and nursery staff were made in pretty much the same manner as the manatee baubles above, though with Christmas trees I had cut with the Cricut machine, decorated with stars and other sparkly sequins by Darwin. Similar trees could be made by securing the invisible thread between two foam Christmas Tree stickers.
Other Christmas Projects


Click any of the images to read about these Christmas makes.
Though I did not get to write about these last four projects as in-depth as I might have liked, I have had a great time adding to our handmade Christmas preparations. Darwin has done so much Christmas crafting of his own, as well. At nursery he has made reindeer food to sprinkle on the lawn on Christmas Eve, a stocking, an angel and a reindeer. Our living room is full of personal joy. I wish each person reading this a gentle and loving Christmas and can’t wait to see everyone else’s handmade Christmas joy.
x x x